
How did Charles Leclerc fall from second on the grid to sixth at Imola? While there were clear factors including his late spin in chase of Sergio Perez, the data tells a much deeper story. Here’s how the championship leader’s Emilia Romagna Grand Prix unfolded – and unravelled.
PALMER: Conditions may have been tough at Imola – but here’s why the F1 grid excelled themselves
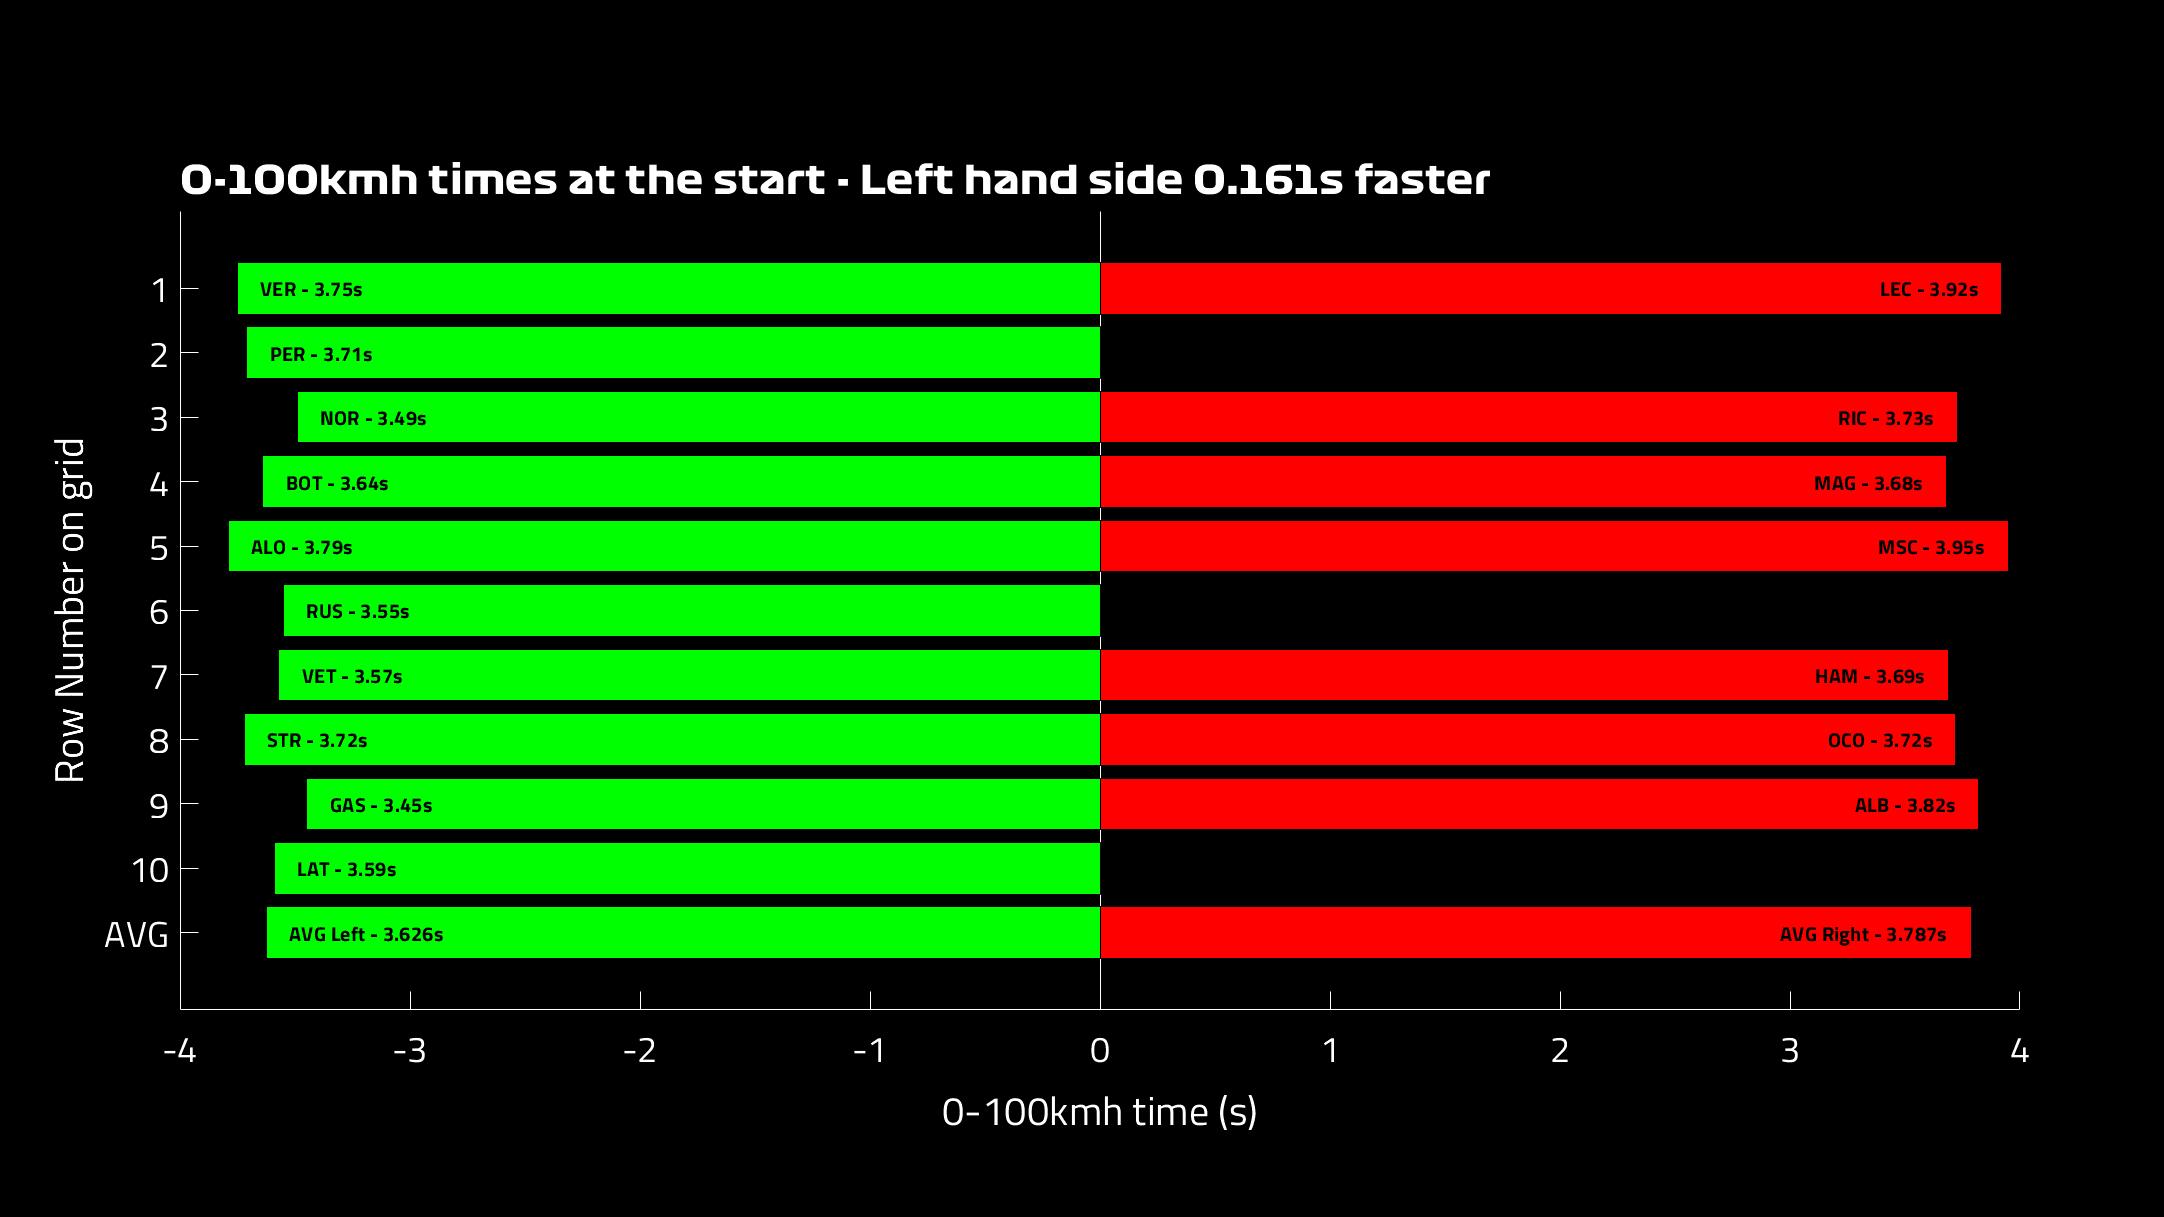
The start
When the lights went out Leclerc fell to fourth behind Lando Norris and Perez, who jumped to P2 behind eventual winner Max Verstappen. Our data shows that while Verstappen, Perez and Leclerc had similar reaction times, Leclerc was two tenths of a second slower in reaching 100km/h; he took 3.92s to do so while Verstappen took 3.75s and Perez 3.71s.
In fact, the only driver who had a slower getaway to 100km/h was Haas’s Mick Schumacher (3.95s).
Much of that could be down to the difference in grip between the left and right sides of the grid, our analysis showing that those who started on the left-hand side were on average 0.161s faster to reach 100km/h.
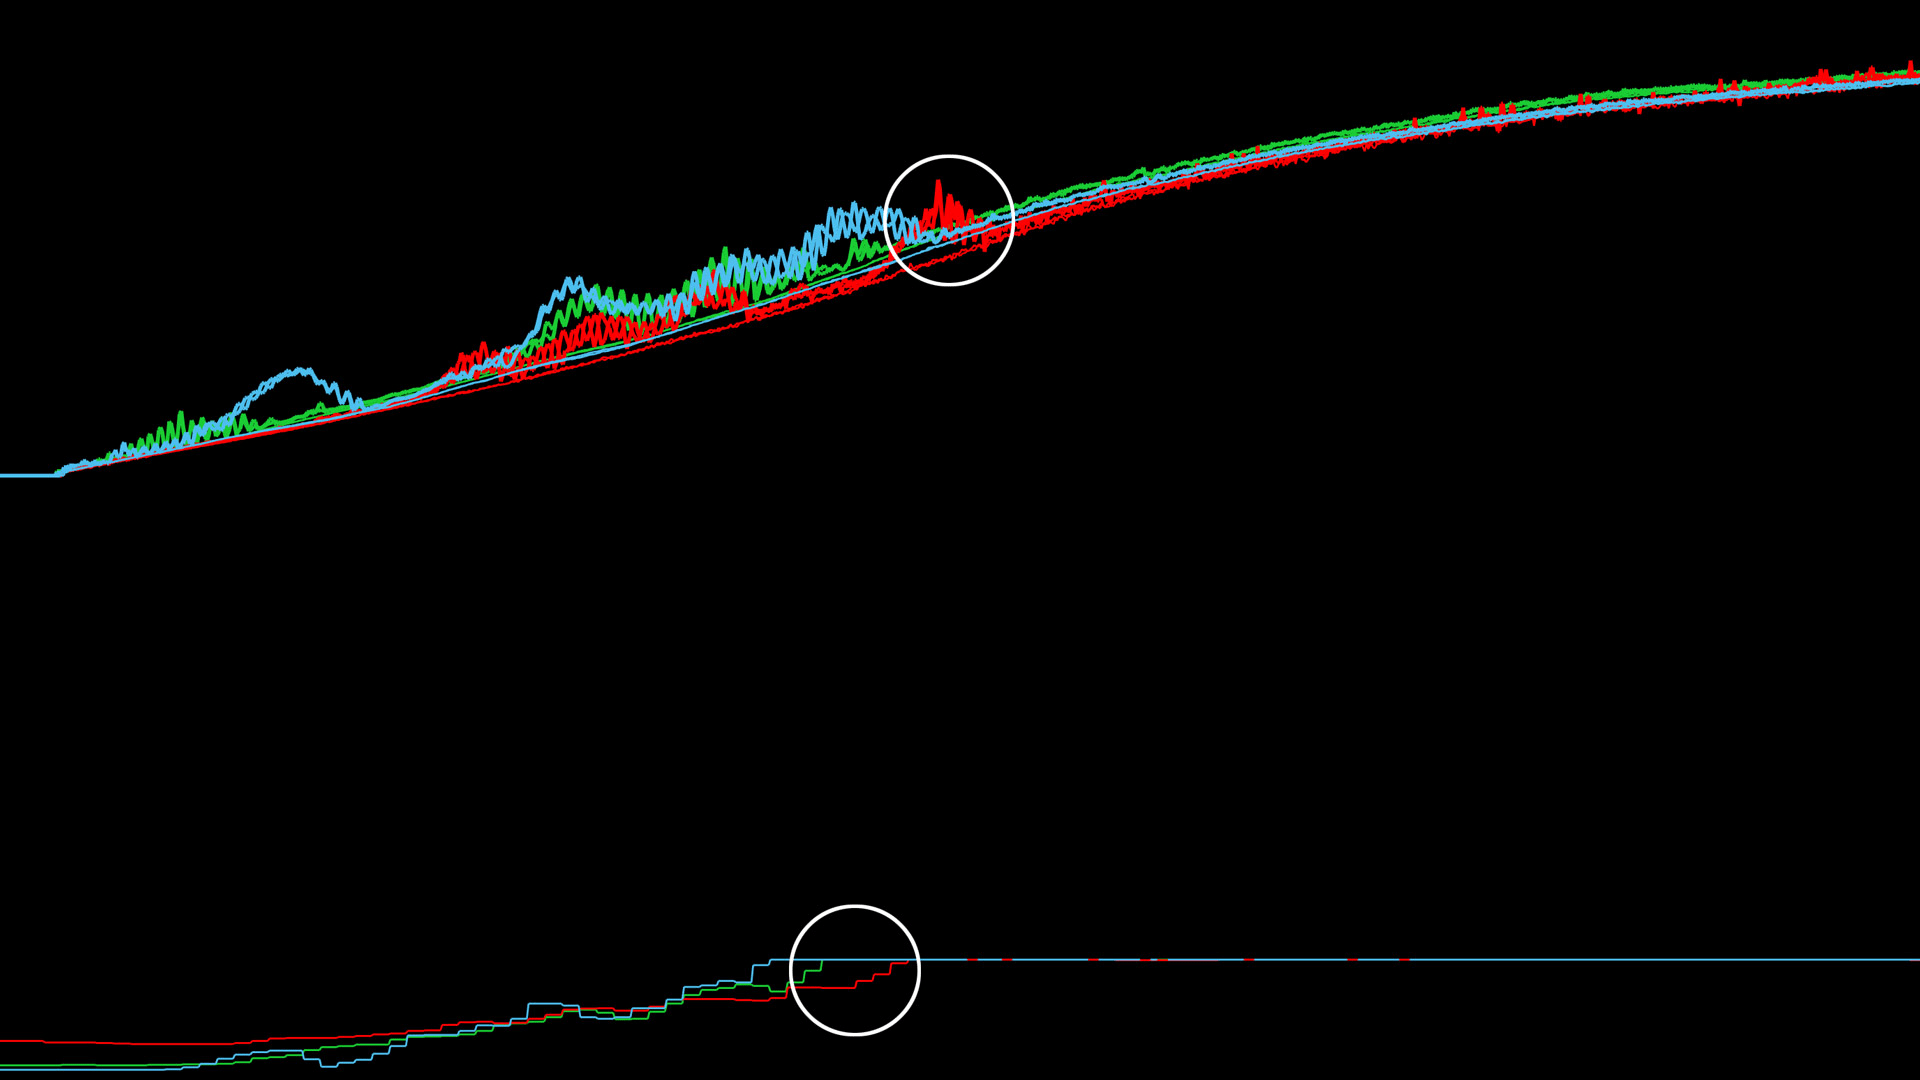
A trace of the rear wheels for Leclerc, Perez and Verstappen shows that Leclerc didn’t encounter wheelspin until later than the Red Bull drivers (all three getting away in second gear) – perhaps implying that he was more tentative than the Red Bulls in getting on the throttle in wet conditions.
POWER RANKINGS: Where do the drivers stand after the 2022 Emilia Romagna Grand Prix?
The first pit stop
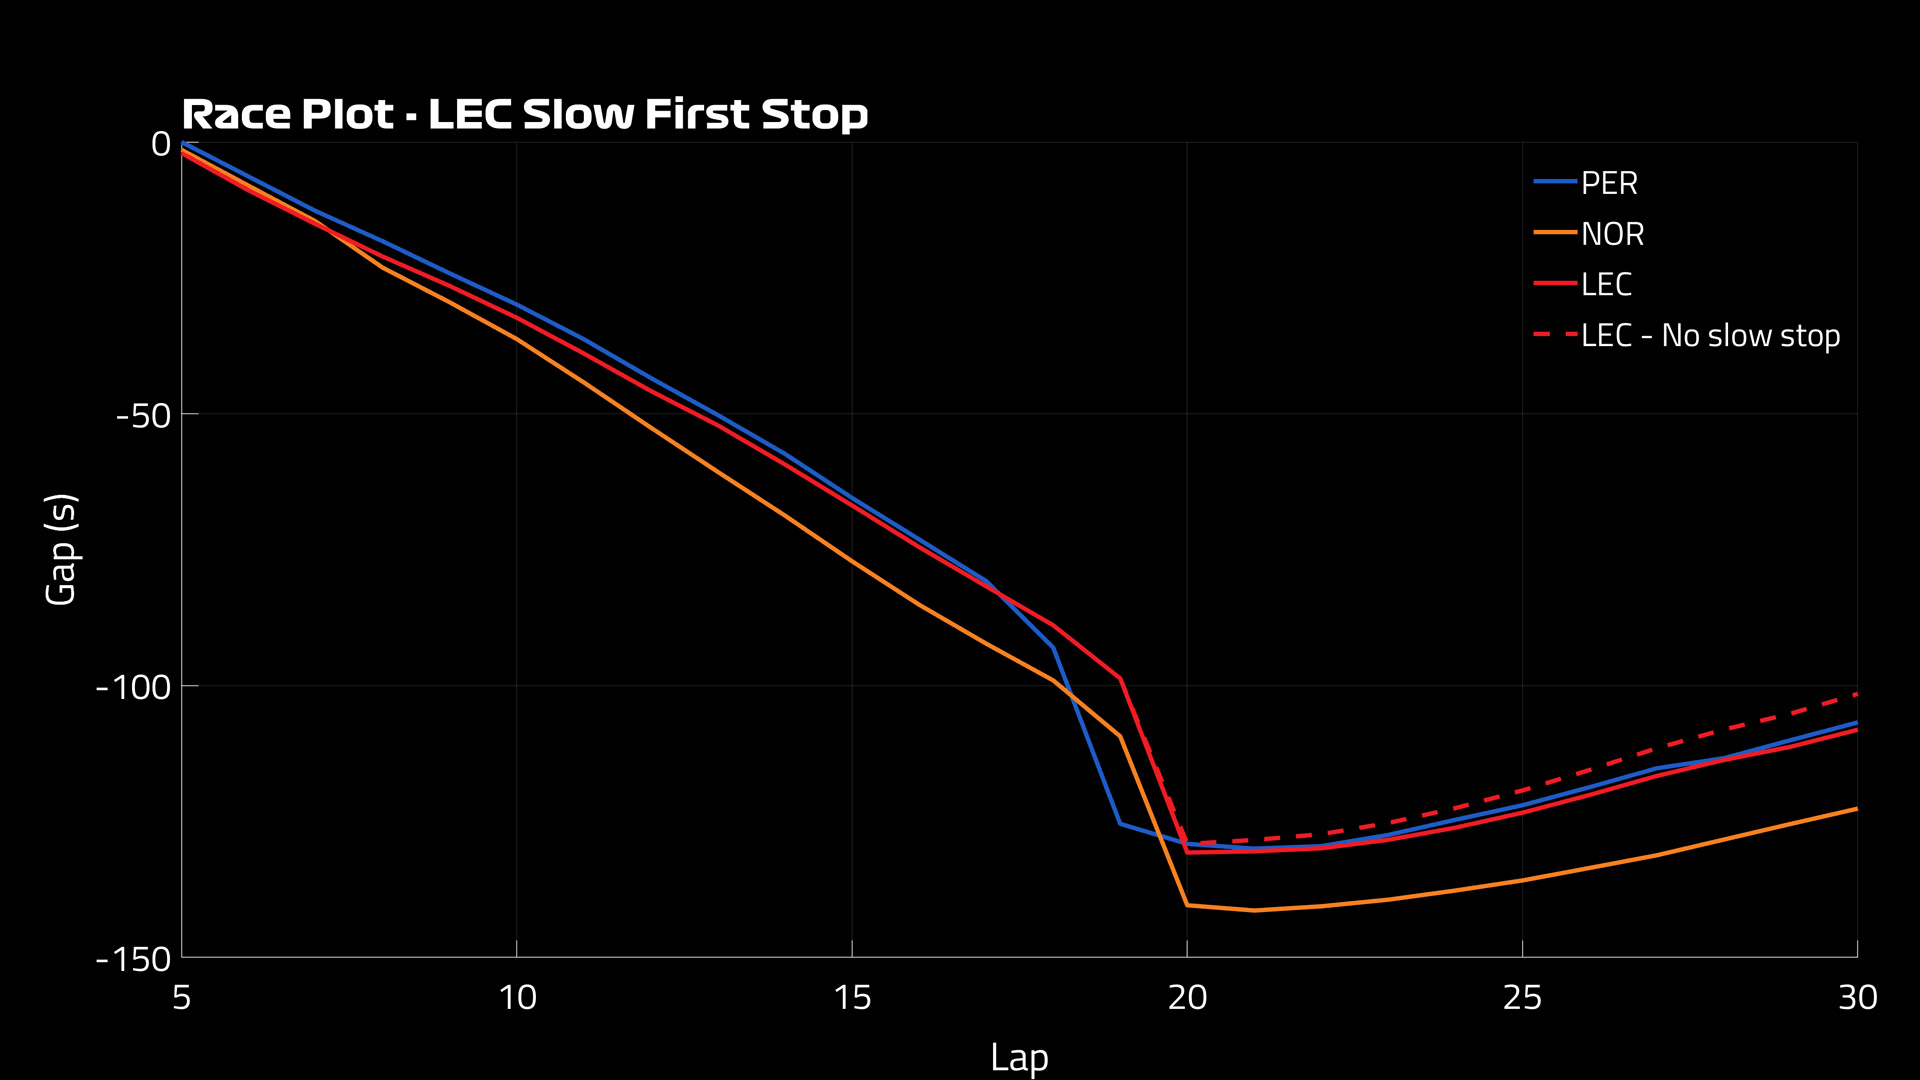
For a moment, it was advantage Leclerc in the battle for P2 against Perez.
The Mexican was ahead of Leclerc before the first pit stop window opened, Perez stopping one lap earlier than Leclerc. Thanks to a superior in-lap to the pits, when Leclerc emerged from his Lap 19 stop, he was briefly ahead of Perez – but couldn’t keep the pace and lost out to the Red Bull once again.
A slow first pit stop had Leclerc stationary for 3.73s but thanks to his in-lap, the Ferrari driver had just managed to overcut Perez. Then he was re-passed before Turn 5. If Leclerc had a similar stop to that of Perez, around 2.5s, he might have been able to make that overcut stick.
The plot below shows that without the slow stop Leclerc would have emerged (dashed line), and likely with enough margin over Perez to get his medium tyres into the working temperature, and then pull away – especially as there was no DRS until Lap 35.
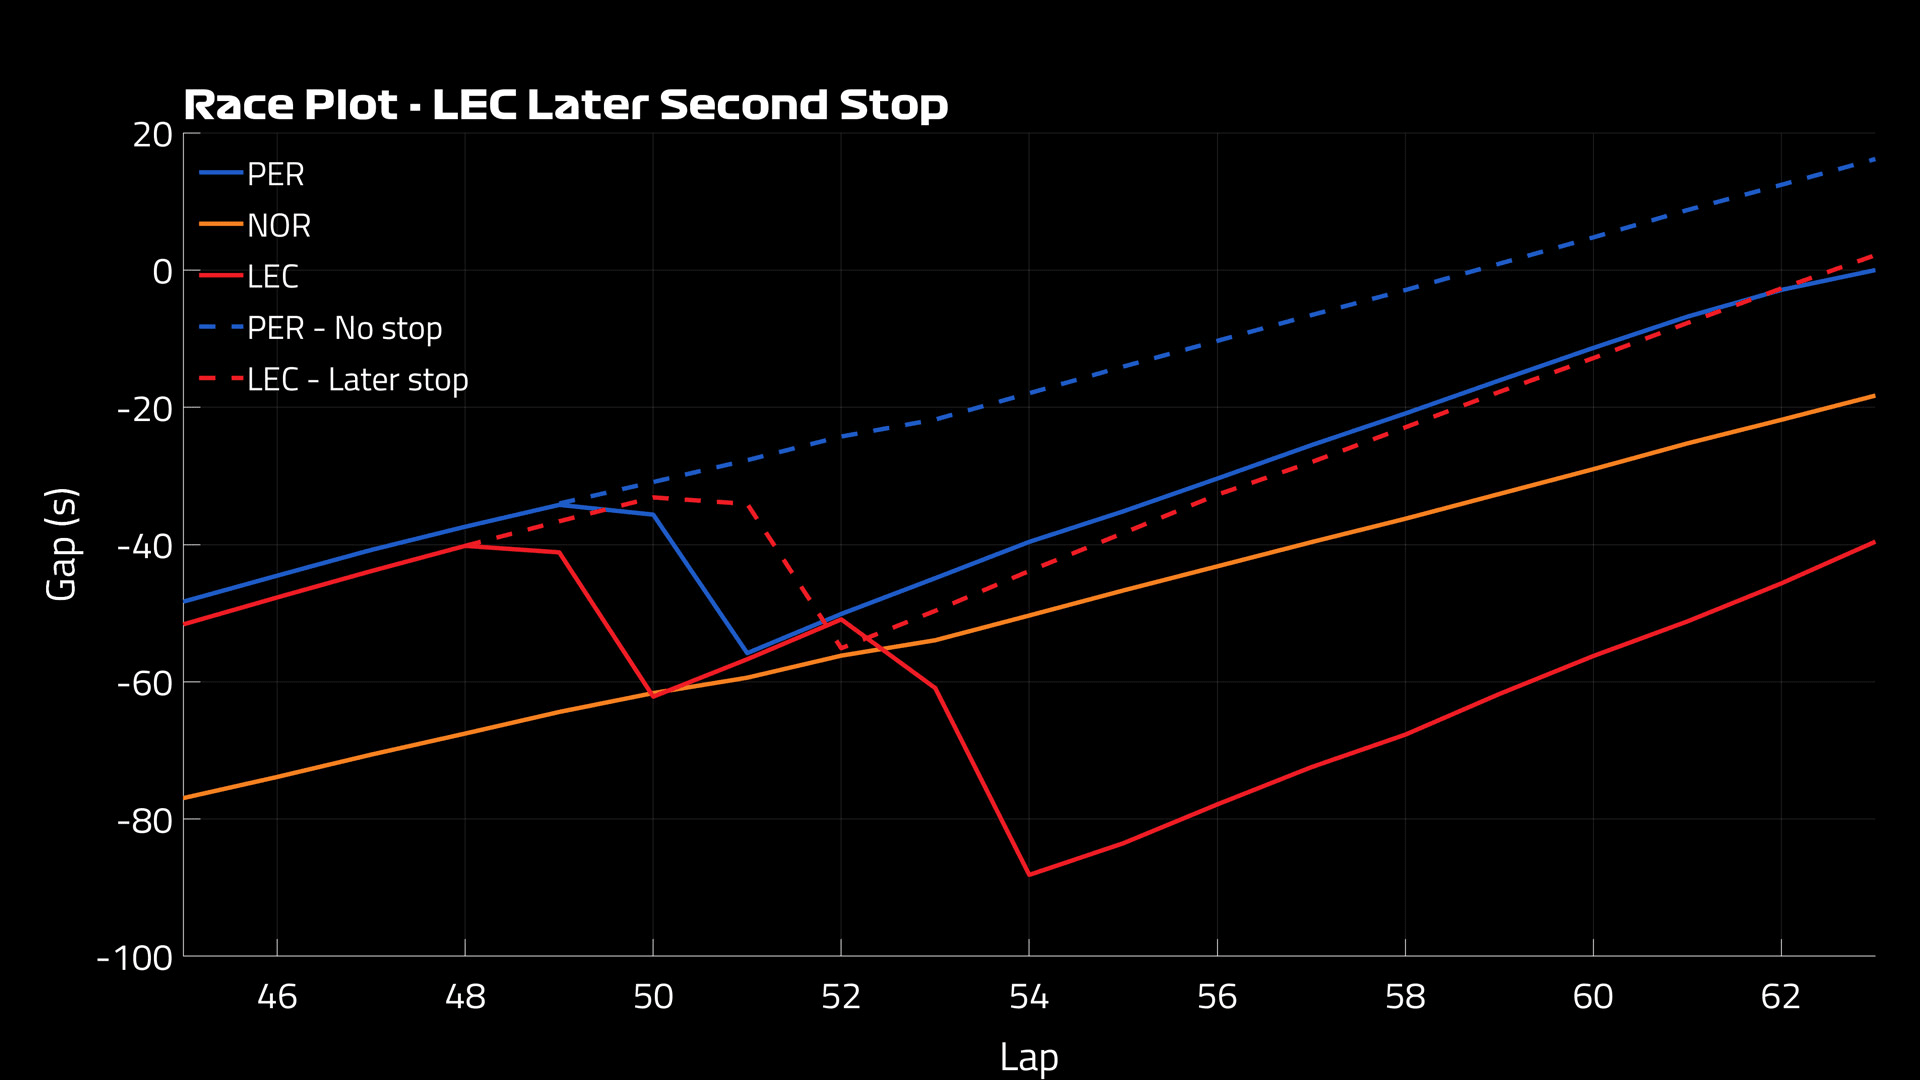
The second pit stop
Leclerc stopped at the end of Lap 49, a decision that Team Principal Mattia Binotto called the “right choice” as he denied it was for the fastest lap bonus point. Binotto reasoned that Leclerc was stopped to force Perez to pit and give the Ferrari another chance to attack.
READ MORE: Binotto expects advantage to shift ‘race by race’ between Ferrari and Red Bull
What cost Leclerc was his in-laps – he lost 0.5s on Laps 48 and 49 compared to Lap 47. He lost that time in three areas:
- On Lap 48, Leclerc made several steering corrections going into Turn 7, losing around 0.15s on the previous lap
- On Lap 49, Leclerc carried too much speed into Turn 5 and lost two-tenths compared to Lap 47
- On Lap 49, just before entering the pits, he lost another tenth braking too early into Turn 17
As a result, Leclerc lost out to Lando Norris when exiting the pits on Lap 50.
Extrapolating Leclerc’s pace (dashed red line below) before he’d pitted shows that the Ferrari driver could have safely emerged ahead of Norris if he had pitted on Lap 51 rather than Lap 49, taken P3, and fastest lap. In that case, however, Perez could have cruised to P2 without pitting…
READ MORE: Norris hails ‘amazing’ McLaren performance after consecutive Imola podiums
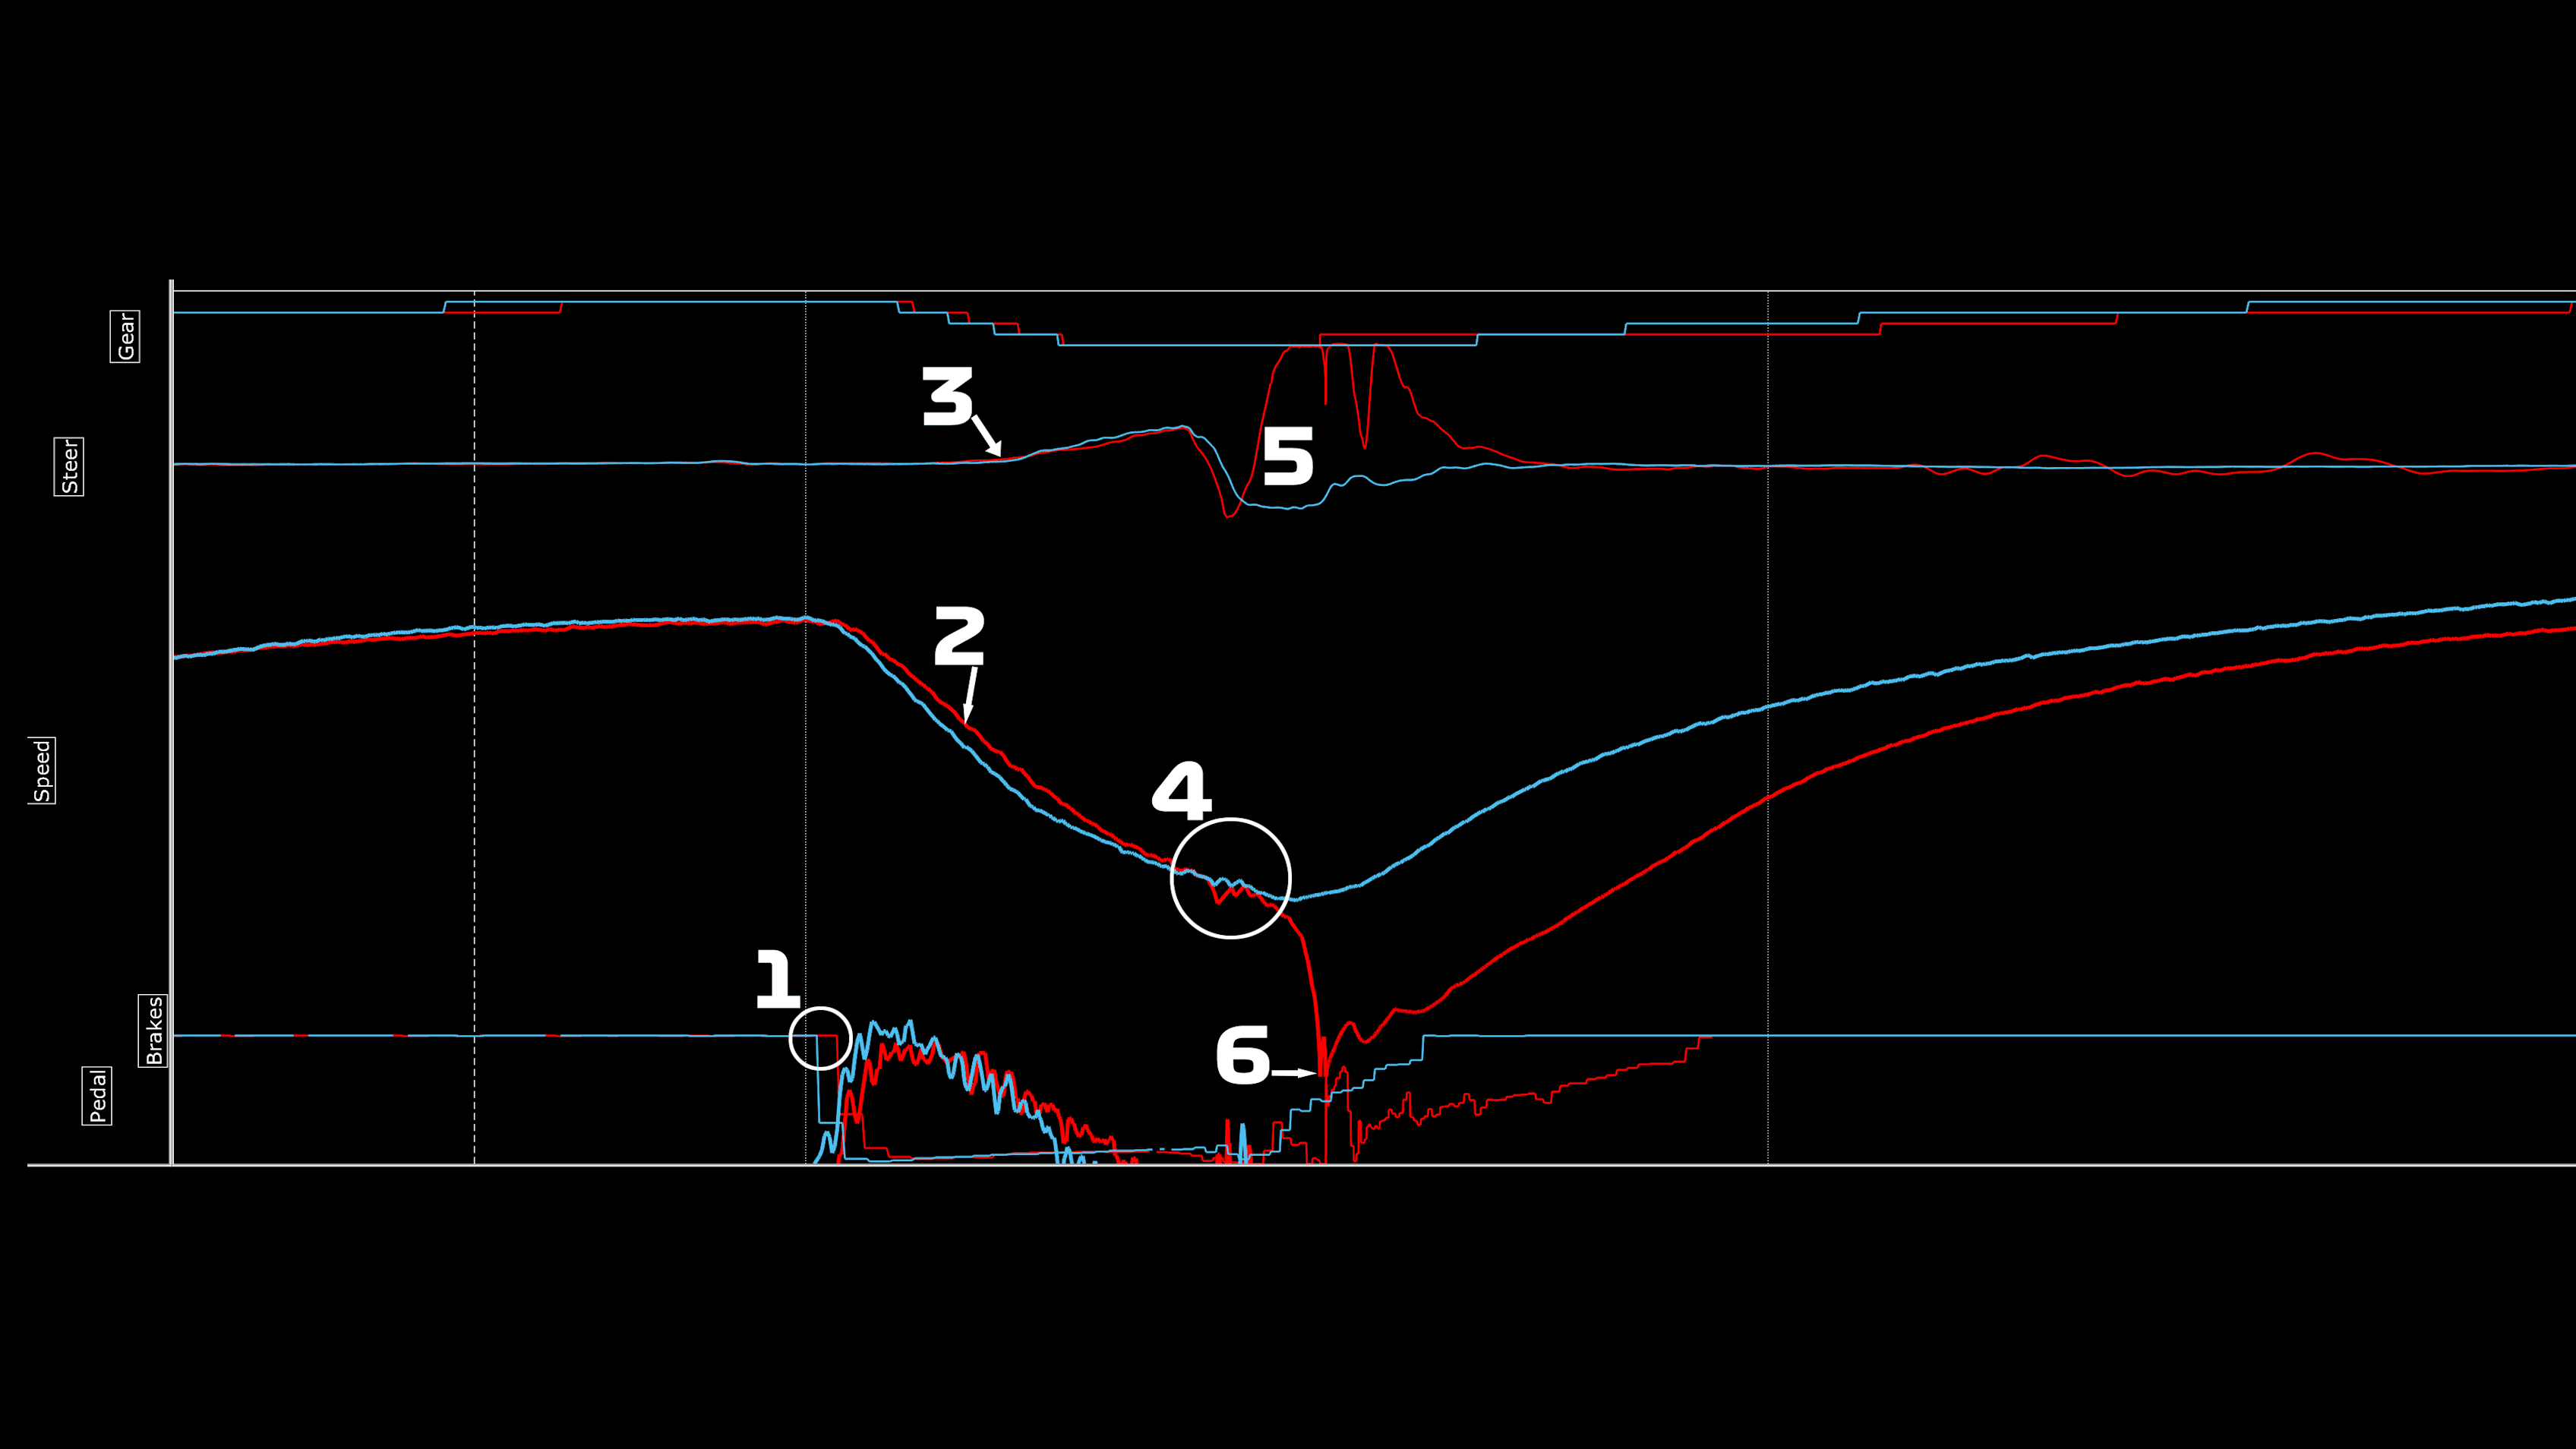
The spin
Leclerc pitted on Lap 49 and went off in chase of Perez, who responded to the Ferrari’s stop one lap later and spent 0.415s less in the pits.
The Ferrari did, however, catch up, but on Lap 52 he spun at Variante Alta and hit the barriers. The chart below breaks that sequence up into six sections:
- Leclerc (red line) brakes much later than on the previous lap
- Leclerc decelerates at a slower rate
- The extra speed Leclerc is carrying into the corner sees him turn in earlier – and go over the entry kerb
- The kerb causes a significant loss of speed
- Leclerc countersteers
- The car hits the barrier, and Leclerc has to pit once again
TECH TUESDAY: A look at Red Bull and Mercedes' Imola upgrades as the development race kicks off
“The mistake, yes, it's easily done. Of course, he was pushing hard to try and fight Checo but… it is painful, but I think he knows that himself, you know, he doesn't need to hear that from anyone,” said Verstappen about Leclerc’s mistake.
The championship leader recovered from ninth, where he emerged after pitting, to P6. And Verstappen, who went on to win by 16.5 seconds, has now cut the 46-point deficit to just 27.
Next Up
Related Articles
 ‘Finally!’ – Fisichella on Antonelli’s F1 success so far
 Bortoleto hails Audi progress after Silverstone points finish
 Palmer picks out ‘huge problem’ for Russell in title fight
.webp) UnlockedHow Ferrari and McLaren continued to push development boundaries
UnlockedHow Ferrari and McLaren continued to push development boundaries 10 World Cup winners who have crossed paths with F1
 How improving Hadjar is learning from Verstappen